HTML Tables
Tables
are defined with the <table> tag. A table is divided into rows
(with the <tr> tag), and each row is divided into data cells (with
the <td> tag). td stands for "table data," and holds the content
of a data cell. A <td> tag can contain text, links, images, lists,
forms, other tables, etc.
Table Example
<table border="1">
<tr>
<td>row 1, cell 1</td>
<td>row 1, cell 2</td>
</tr>
<tr>
<td>row 2, cell 1</td>
<td>row 2, cell 2</td>
</tr>
</table>
How the HTML code above looks in a browser:

HTML Tables and the Border Attribute
If
you do not specify a border attribute, the table will be displayed
without borders. Sometimes this can be useful, but most of the time, we
want the borders to show.
To display a table with borders, specify the border attribute:
<table border="1">
<tr>
<td>Row 1, cell 1</td>
<td>Row 1, cell 2</td>
</tr>
</table>
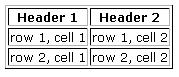
HTML Table Headers
Header information in a table are defined with the <th> tag.
All major browsers display the text in the <th> element as bold and centered.
<table border="1">
<tr>
<th>Header 1</th>
<th>Header 2</th>
</tr>
<tr>
<td>row 1, cell 1</td>
<td>row 1, cell 2</td>
</tr>
<tr>
<td>row 2, cell 1</td>
<td>row 2, cell 2</td>
</tr>
</table>
How the HTML code above looks in your browser:
HTML Table Tags
Tag Description
<table> Defines a table
<th> Defines a table header
<tr> Defines a table row
<td> Defines a table cell
<caption> Defines a table caption
<colgroup> Defines a group of columns in a table, for formatting
<col /> Defines attribute values for one or more columns in a table
<thead> Groups the header content in a table
<tbody> Groups the body content in a table
<tfoot> Groups the footer content in a table
HTML Forms
HTML Forms are used to select different kinds of user input. HTML forms are used to pass data to a server.
A
form can contain input elements like text fields, checkboxes,
radio-buttons, submit buttons and more. A form can also contain select
lists, textarea, fieldset, legend, and label elements.
The <form> tag is used to create an HTML form:
<form>
.
input elements
.
</form>
HTML Forms - The Input Element
The
most important form element is the input element. The input element is
used to select user information. An input element can vary in many ways,
depending on the type attribute. An input element can be of type text
field, checkbox, password, radio button, submit button, and more.
The most used input types are described below.
- Text Fields
<input type="text" /> defines a one-line input field that a user can enter text into:
<form>
First name: <input type="text" name="firstname" /><br />
Last name: <input type="text" name="lastname" />
</form>
How the HTML code above looks in a browser:

- Password Field
<input type="password" /> defines a password field:
<form>
Password: <input type="password" name="pwd" />
</form>
How the HTML code above looks in a browser:

- Radio Buttons
<input type="radio" /> defines a radio button. Radio buttons let a user select ONLY ONE of a limited number of choices:
<form>
<input type="radio" name="sex" value="male" /> Male<br />
<input type="radio" name="sex" value="female" /> Female
</form>
How the HTML code above looks in a browser:

- Checkboxes
<input
type="checkbox" /> defines a checkbox. Checkboxes let a user select
ZERO or MORE options of a limited number of choices.
<form>
<input type="checkbox" name="vehicle" value="Bike" /> I have a bike<br />
<input type="checkbox" name="vehicle" value="Car" /> I have a car
</form>
How the HTML code above looks in a browser:

- Submit Button
<input type="submit" /> defines a submit button.
A
submit button is used to send form data to a server. The data is sent
to the page specified in the form's action attribute. The file defined
in the action attribute usually does something with the received input:
<form name="input" action="html_form_action.asp" method="get">
Username: <input type="text" name="user" />
<input type="submit" value="Submit" />
</form>
How the HTML code above looks in a browser:

No comments:
Post a Comment